Introduction
Garbage disposals help keep our kitchens clean. They grind food waste into small pieces. This helps to prevent clogs in your pipes.
Knowing the parts of a garbage disposal is useful. It helps you maintain and repair the device.
Main Parts of a Garbage Disposal
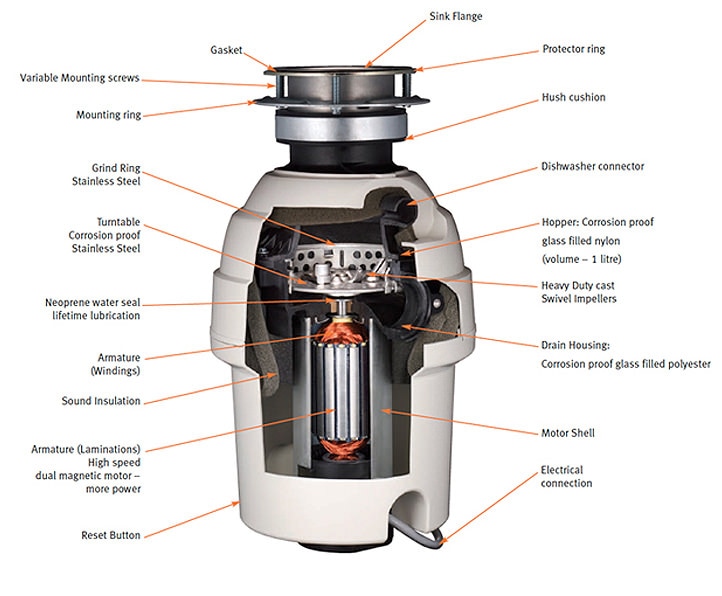
A garbage disposal has many parts. Each part has a specific function. Let’s learn about them.
1. Motor
The motor is the heart of the garbage disposal. It powers the grinding blades. The motor is usually located at the bottom of the unit.
2. Grinding Chamber
The grinding chamber is where the magic happens. Food waste is ground into tiny pieces here. The chamber is made of durable materials.
3. Impellers
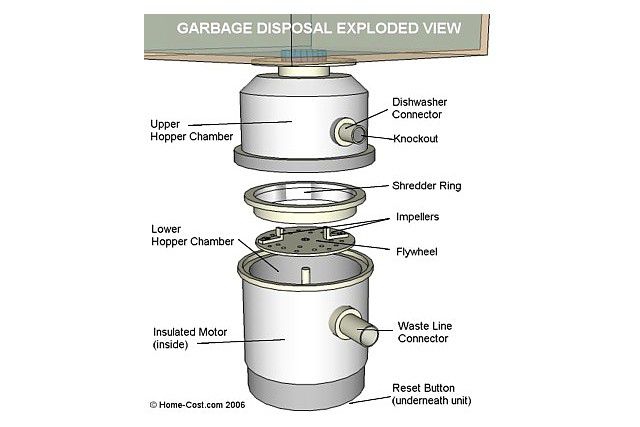
Impellers help break down food waste. They are like small, spinning hammers. Impellers are located inside the grinding chamber.
4. Flywheel
The flywheel connects to the motor. It helps the impellers move. The flywheel is an important part of the grinding process.
5. Shredder Ring
The shredder ring works with the impellers. It helps to further break down food waste. The shredder ring has sharp edges for cutting.
6. Splash Guard
The splash guard is a rubber piece. It prevents food and water from splashing out. It is located at the top of the grinding chamber.
7. Reset Button
The reset button is a safety feature. If the disposal jams, the button can reset it. It is usually found at the bottom of the unit.
8. Power Cord
The power cord provides electricity to the motor. It is plugged into an electrical outlet. The cord must be in good condition for safety.
9. Mounting Assembly
The mounting assembly attaches the disposal to the sink. It keeps the unit securely in place. The assembly includes various brackets and screws.
10. Drainage Connection
The drainage connection helps to remove ground food waste. It connects to your home’s plumbing system. Proper connection is key to avoiding leaks.
11. Gasket
The gasket creates a seal. It prevents water from leaking. The gasket is located between the sink and the disposal unit.
12. Dishwasher Inlet
The dishwasher inlet is a small tube. It allows dishwasher water to enter the disposal. This helps to dispose of food particles from dishes.

Credit: www.jroweplumbing.com
:max_bytes(150000):strip_icc()/visual-guide-of-a-garbage-disposal-1824882_V2-5394218eb74d4b949697be17ff05ea54.gif)
Credit: www.thespruce.com
Common Issues and Maintenance Tips
Garbage disposals can sometimes have issues. Knowing the parts helps you fix them. Here are some common problems and tips.
Jamming
Jamming happens when food gets stuck. Turn off the power before clearing a jam. Use an Allen wrench to turn the flywheel and free the jam.
Leaking
Leaking often happens at the gasket or drainage connection. Check these parts regularly. Replace the gasket if it is worn out.
No Power
No power can be due to a tripped circuit. Check the reset button. Ensure the power cord is plugged in properly.
Strange Noises
Strange noises may mean something is stuck. Turn off the unit and inspect it. Remove any foreign objects.
Bad Smells
Bad smells are often due to food buildup. Clean the disposal with ice and lemon. This helps to remove odors.
Frequently Asked Questions
What Are The Main Garbage Disposal Parts?
The main parts include the motor, blades, and grind ring.
How Do I Replace Garbage Disposal Blades?
First, disconnect power. Then, unscrew the blades and replace them with new ones.
Can I Repair A Leaking Garbage Disposal?
Yes, check the gasket and seals. Replace if necessary.
What Is A Garbage Disposal Splash Guard?
A splash guard prevents water and debris from splashing out.
Conclusion
Understanding garbage disposal parts is important. It helps you maintain and repair your unit. This ensures your kitchen stays clean and functional.
Regular checks and cleaning can prevent most issues. Always remember to stay safe when working with your disposal.

